Table of Contents
Connecting to DVRs and NVRs
You can connect to any NVR, DVR or Camera that has ONVIF or RTSP. This means you can connect your TetherBoxes to the vast majority of products manufactured since 2007.
Some of the vendors we have tested include: Axis, Sony, Samsung, Panasonic, D-Link, Vivotek, Merit-Lilin, Edimax, Cisco, Sunell, AVTech, TVT, Grandstream, Canon, Hikvision, Dahua and many others.
Configure your DVR (if needed)
Many DVRs/NVRs work out of the box. If yours is not working, check the following settings. The screenshots show a Hikvision DVR; your interface may differ.
Enable RTSP
Ensure RTSP is switched on and set to port 554 (usually under Configuration → Network → RTSP).
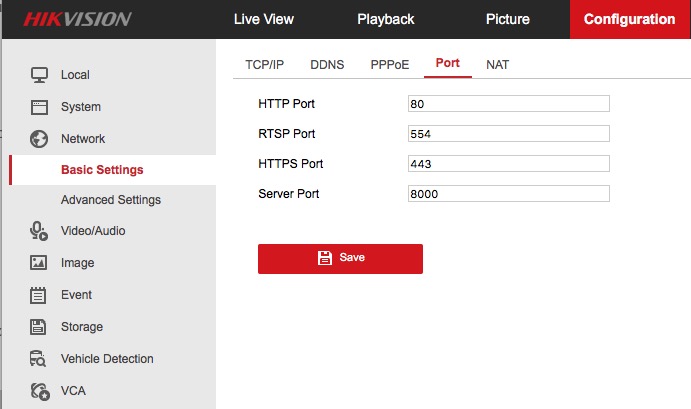
Tip: Some DVRs have a separate RTSP username/password under Users. Make note of it if present.
Set Camera Quality
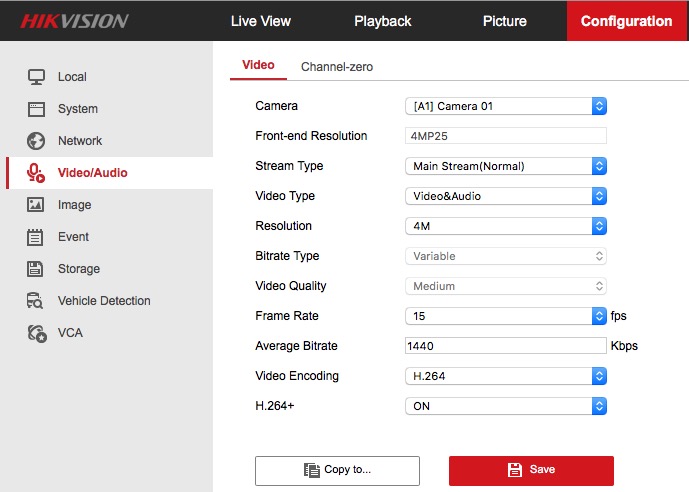
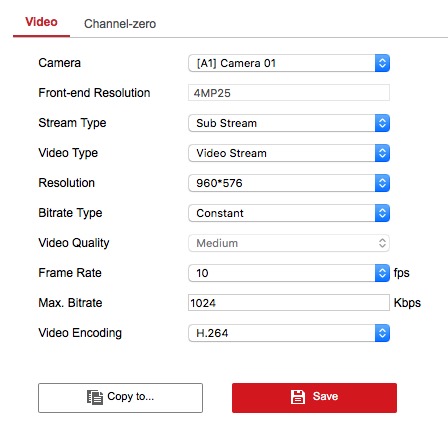
Tip: The quality you set on the DVR is what the TetherBox will record. If set to 704x576, it records at that resolution.
Warning: If your DVR uses H.265, consider switching to H.264 or H.264+ for better browser and mobile compatibility.
Optional: Enable ONVIF if your DVR supports it.
Add your DVR/NVR
- Go to Admin → Cameras → New Camera
- Select the DVR/NVR tab
- Enter the DVR/NVR name and IP address
- Select the vendor and number of Cameras
- Enter the username and password
- Click Add
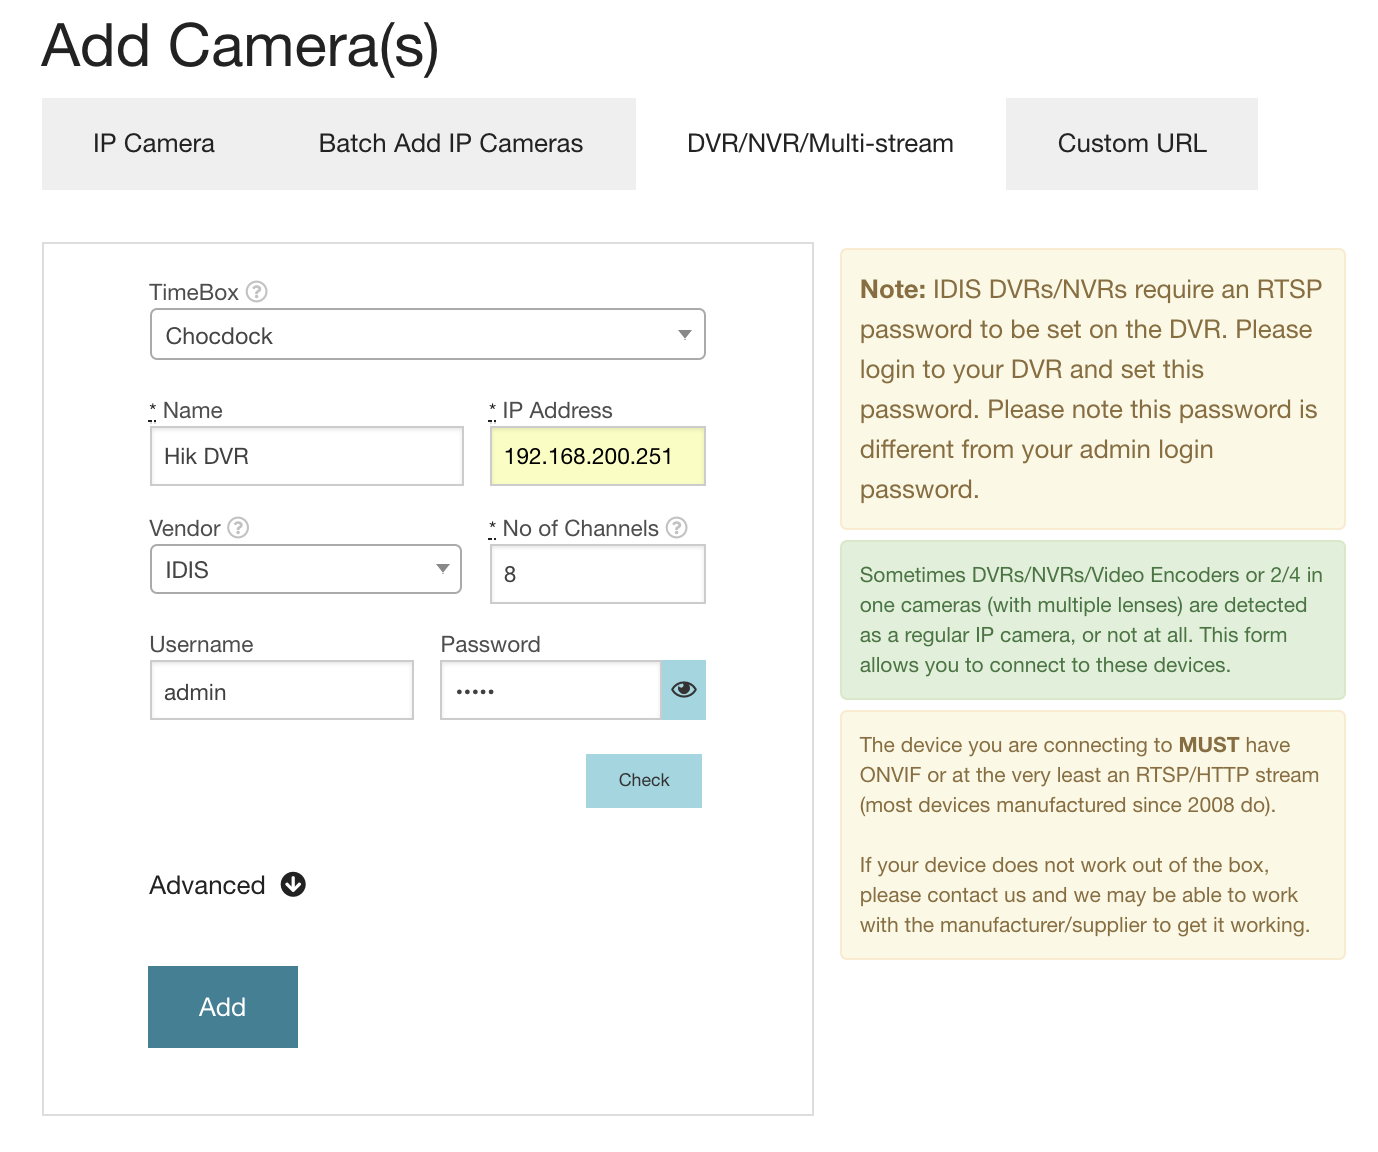
Tip: Use the "Check" button to verify credentials before adding.
Warning: If your vendor is not listed, try selecting "Other".
DVR/NVR Not Listed?
If your DVR is not in the list, you'll need the RTSP URL. Enter it under the "Custom URL" tab in the New Camera dialogue.
Warning: RTSP URLs are usually in the DVR/NVR manual. Contact the manufacturer if you cannot find it.
Common RTSP URL Formats
Most DVRs/NVRs (Dahua, TVT, Genie, etc.):
rtsp://[user]:[password]@[ip]/cam/realmonitor?channel=[channel]&subtype=[stream]
Example: rtsp://admin:pass@192.108.1.108/cam/realmonitor?channel=1&subtype=1
Hikvision DVRs/NVRs:
rtsp://[user]:[password]@[ip]/streaming/channels/[channel]0[stream]
Example for camera 3: rtsp://admin:12345@192.168.1.3/streaming/channels/301
Example for camera 10: rtsp://admin:12345@192.168.1.3/streaming/channels/1001
If you're unable to find the RTSP URL, please contact us and we may be able to help.
Recording one DVR/NVR across multiple TetherBoxes
A single network device (a DVR or NVR detected by its MAC address) can only be managed by one TetherBox per site. Two TetherBoxes in the same site cannot both claim the same NVR, so you cannot directly split an NVR's channels between them.
This comes up when you want two TetherBoxes to share one DVR/NVR, for example splitting the channels so each unit records a different set of cameras. There are three ways to do it.
Option 1: Activate each TetherBox in a separate site
Add each TetherBox to its own sites. The network device is then discovered separately by each unit, appearing once per site, and each copy can be managed independently. This is the cleanest option and keeps recording, analytics and playback working normally on both TetherBoxes.
Option 2: Add each channel as a manual camera
On the second TetherBox, add the channels you want as manual Cameras using the Custom URL tab, hard coding the full RTSP URL with the DVR/NVR's IP address and credentials (see the RTSP formats above). Leave the analytics and recording path blank.
Because a manually added camera is not linked to a discovered network device, it bypasses the one-TetherBox-per-device limit, so the same NVR can be used by both units.
Warning: Manual cameras must be maintained by hand. If the DVR/NVR's IP address or credentials change, you will need to update each channel's URL yourself.
Option 3: Use a larger TetherBox
If the goal is simply more recording capacity, fit a single TetherBox large enough to record all the desired channels from the NVR. One unit then manages the whole device with no manual configuration.
Tip: Not sure which option suits your deployment? Contact us and we can advise.
Referenced in: